I thought, “how in the world do they do that?”
I knew how to create a simple pattern, but how do I get that pattern
to be seamless and fill a 12 by 12 paper correctly?
I played and played until I did it my way.
This was the easiest way I have found to do it.
I hope you find this tutorial easy, too.
This tutorial written in Photoshop CS2,
but can be done in PSP, as well.
This tutorial is for the advanced user,
as I have not included screen shots.
Let’s Begin!
The first thing we’ll be doing is making our own pattern to use.
Open a new 200 by 200 pixel, white, 300 dpi image in Photoshop or Paint Shop Pro,
doesn’t matter which one you use, although I prefer Photoshop.
Next choose a brush or shape you would like to make your pattern with.
Make sure your background and foreground colors are set to black or a gray color.
This is so your pattern can be colored, later on.
Also, keep in mind you can reverse,
and instead use a black background with white or gray images, as well.
Create a new raster layer.
Draw your shape or brush as big as you wish it to appear overall.
I think smaller images make better patterns myself.
So sizing is strictly up to the effect you “wish” to create.
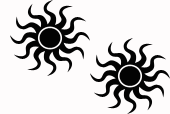
Once you get your image drawn, duplicate it.
Move your duplicated shape/brush straight across from it,
or you can stagger it a little, this is up to you, as well.
Images below show what I mean, in either case.


Once you have your duplicated shape/brush
where you want it to be, merge your image visible.
Next, crop out any access background.
Go to edit, Define pattern, give it a name, and yes, save it.
You’ve just created your pattern.
Now on to the fun part, that is,
checking out what it looks like on a 12 by 12 paper.
Open up a 12 by 12, 300 dpi, transparent image.
Go to edit, and choose fill from the list.
Choose your patterns menu.
Scroll down the list of patterns,the pattern you just created
will be the last one in your pattern menu.
Choose your pattern, and click okay.
Click on your zoom tool, and click on actual pixels.
This will show you how your pattern overlay, looks on a 12 by 12 paper.
If it doesn’t look great or doesn’t tile correctly, all is not lost,
just mess with your shape/brush image,
and move it around and save as a new pattern.
Once you get it to look how you want, you’ll need to save it.
I’ve created a folder in My Documents for the pattern overlays I’ve created.
Save it where you want, and make sure you save it as a png file.
There are so many patterns and styles you can create.
Remember, you aren’t just limited to using shapes and brushes,
you can use other images, as well.
The main thing is to get them to tile correctly.
Also, if you are making patterns to sell,
remember to use copyright free images,
and things you’ve created yourself as not to violate any TOU’s.
I hope you enjoyed this tutorial.
If you try it, and found it helpful
would love to hear from you.
Just leave me a comment here in the post, or in my shoutbox.
Huggles, the Sunshiny Scrapper
© the Sunshiny Scrapper, 2007.


No comments:
Post a Comment